 KEYBOARDING INTRODUCTION LESSON PLAN
Material:
-
1. Computer keyboards – 1
per student.
-
2. Wall chart showing keys
and fingerings of the
keyboard (see below)
-
3. Paper to tape on the
keyboards over the hands of
each student.
Procedure:
Teachers: discuss with the
students the useful skill of
keyboarding. How well they learn
depends on their interest, their
effort and their ability to
follow directions.
Improvement should be
their goal of each practice
session.
The Typing Position - Technique
and Posture:
-
Eyes on copy
-
Fingers curved and upright
-
Wrists low
-
Forearms slanted with
keyboard
-
Sit back in chair, back
straight
-
Feet on floor
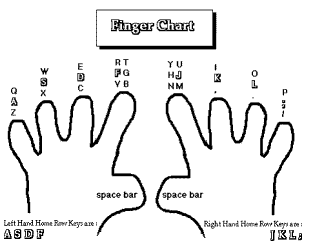
The Home Row
Have students place their
fingers in the home row
position.
Position fingers of the left
hand on asdf and the right
fingers on jkl;. Remember:
fingers should be curved,
relaxed, and upright. Thumbs
should be placed on the space
bar.
Show students where the <return>
or <enter> key is located –
practice reaching this key with
right pinky finger.

Go to Printable Finger Chart

Lesson Printable Materials -
Worksheets
Print out the lessons and
keyboarding worksheets for
use with this keyboarding lesson plan:
Teachers: let students follow
your voice to the following
drills and punch a key for each
letter you say (or, print the
worksheet and let them follow
themselves). Make sure the
class is together in rhythm -
striking keys with quick, sharp
strokes.
Repeat as necessary,
speeding up each time. Accuracy,
not speed, is the main goal for
beginners. After a few practice
sessions, tape paper over
student's hands so they can't
look at the keyboard.